Monday 1 August 2016

Earl Grey and Cassis Cake


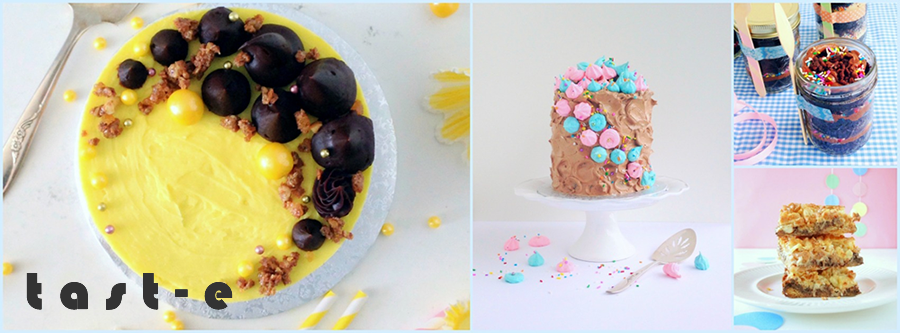
It was my friend Cat’s birthday and I think she’ll agree that she’s a very lucky birthday girl - cake-wise at least. She got 3 cakes, 2 of which were from me! I had planned an earl grey and black currant/cassis cake, when her sister asked me to re-make a the cake from last year. So the first cake she got was this pared-down version of last year’s banana nut crunch cake.


As I was making her second cake, I was reflecting on how long we’ve been friends - a long time. How long? Since the days when she worked at Blockbuster! Do you remember Blockbuster? Ahh, those were the days.

Anyway, do you know Ribena? It’s a black currant drink concentrate and it’s something that I’ve been wanting to incorporate into a cake for a while. So I tried out a black currant (aka cassis) curd.

Check out the verdict at the end of the post!

Earl Grey Cake Layers
I used the recipe by Tessa Huff and baked in 3, 6-inch cake pans for 35 min.

Cassis Curd (Make ahead of time)
Ingredients
½ cup Ribena
3 eggs
6 Tablespoon butter

Directions
  1. Combine Ribena and eggs in a small sauce pan. Put on low heat and whisk continuously until thick.
  2. Place butter in a bowl and strain the curd with a fine sieve over top. Stir to combine.
  3. Cool completely before using.

Toasted Meringue Decor
Ingredients
4 teaspoons of meringue powder
4 Tablespoons of Ribena (or water)

Directions
  1. Combine meringue powder and liquid and whip with a hand held blender until thick and stiff.
  2. When ready to decorate, spoon onto cake and make peaks with a spoon. Toast with a kitchen torch.

Tea Syrup
See directions here and cut amount in half.

Early Grey Swiss Meringue Buttercream
See directions in this earlier post.  
Colour ¼ cup buttercream purple using gel food colouring. Colour the remaining buttercream blue.

Assembly
  1. Place first cake layer on your cake board or plate. Brush tea syrup on top.
  2. Pipe a dam around the perimeter of the cake using the blue buttercream.
  3. Spread the cassis curd inside. Place next layer and repeat. Finish with final cake layer.
  4. Crumb coat the cake with blue buttercream. Freeze for 10 minutes.
  5. Add final buttercream coat. Smear purple buttercream around the cake and use a bench scraper to smooth it out and blend.
  6. Add meringue and toast with a kitchen torch.


Verdict: Overall, this cake was really tasty. It has moist cake layers and visually, it was eye-catching. I just wish that the cassis flavour cake through more - it was a tad egg-y in flavour. In the future, I would just stick with black currant jam. I think Ribena could work well in a frosting.

Saturday 16 July 2016

Bridal Shower Part 4 - Meringue Sandwiches


As if making two cakes and macarons wasn’t enough, I wanted to make something for my friend’s bridal shower party favours. Keeping with the theme of “a shower in Paris”, I decided on meringues. They are so much easier to make than macarons, and as I would soon discover, sooo much more delicious.

Check out the verdict at the end of the post!

Meringue Sandwiches
Meringue recipe from Bakers Royale

Ingredients
3 large egg whites
¾ cup sugar
1 teaspoon vanilla
½ teaspoon white vinegar
Gel food colouring

Directions
  1. Line 2 baking sheets with parchment paper. Pre-heat oven to 200 degrees F.
  2. Wipe down a metal bowl (e.g., of your stand mixer) and whisk with vinegar to get rid of residual grease.
  3. Whisk egg whites to stiff peaks. Gradually add sugar while mixing on medium. Add vanilla and vinegar and continue to whip until stiff and glossy (there should be no granules when you rub between your fingers).
  4. Add gel food colouring and beat to combine.
  5. Place the meringue in a pastry bag with the tip of your choice. I used 2M. Pipe rosettes or other shapes to your liking, 1 inch apart. Smaller rosettes work better (see note at the end).
  6. Bake for 90-120 minutes until the meringue easily peel off the paper. Cool on a wire rack.

Filling
Fillings are only restricted by your imagination. Some options are jam, buttercreams, marshmallow fluff, ganache, lemon curd, caramel, Nutella, cookie butter, etc.
I had leftover chocolate swiss meringue buttercream from the chocolate cake that I made for the shower.

Assembly
Spread filling on one meringue and sandwich with another. Place in an airtight container for 12 hours to ripen.This will soften the meringue and improve the texture and flavour.


Verdict: OMG these are amazing!! Go and make these right now! They are my absolute new favorite treat! The texture is so chewy marshmallow-y and delicious. So happy that I made these for the party favours.

Note: Be sure to pipe smaller rosettes as the moisture from the filling does a better job of making the meringue chewy. Larger rosettes stay relatively crunchy.

Thursday 23 June 2016

Bridal Shower Part 3 - Berry Cheesecake Macarons


As I wrote in my previous posts (here and here), I recently helped throw my very dear friend a Paris themed bridal shower. Of course I had to bake some macarons as part of the event’s dessert line up! The bride loves macarons, particularly the ones from Laduree, which she had for the first time when she went to Paris (and got engaged!).


I’m still on my macaron perfecting journey. I still cannot bake filled macarons (i.e., I end up with hollows). And I’m sad to say that I can’t bake them in the Winter/Fall/Spring because it’s so rainy and humid in Vancouver and I have a gas oven. After many trials and tears, I realized after talking to a foodie colleague, that gas ovens pump out moisture, which destroys macarons. I think it’s completely ridiculous that I can only bake them in the summer - to the point where I might change out my gas oven for an electric.


So good thing it’s summer! I decided on a berry cheesecake filling for the shower. Check out the verdict at the end of the post.


Berry Cheesecake Macarons


Macaron shells
Ingredients
1 ½ cups icing sugar
1 cup + 2 Tablespoons almond meal/ground almonds
3 egg whites
⅛ teaspoon cream of tartar
¼ + 2 Tablespoons sugar
1 teaspoon vanilla
Gel food colouring


Directions
  1. Line three baking sheets with parchment. Wipe the inside of a metal bowl and whisk with vinegar to get rid of any grease. Insert a round tip # 2A into a pastry bag, place in a tall cup, and fold the edge over the outside of the cup.
  2. Combine icing sugar and almond meal in a blender or food processor and pulse a few times to mix and further grind the almonds. Set aside.
  3. Place egg whites in the bowl and beat until frothy. Add cream of tartar and whip to soft peaks. Gradually add sugar while whisking and continue to very stiff peaks.
  4. Add vanilla and combine. Add gel food colouring (I used a mix of pink and purple) and combine. Knock the meringue off the whisk by hitting it against the side of the bowl.
  5. Sift the almond-icing sugar blend into the meringue. Set timer for 30 seconds and mix with a spatula to deflate the air.
  6. Begin to fold and smear the mixture against the bottom/side of the bowl. Take your time and test the consistency periodically - hold some of the mixture up with the spatula and see if it flows down in a thick ribbon. If you can make a number 8 with the flow as it drips off the spatula, it’s ready. Check out this video for a reference on the consistency.
  7. Fill the pastry bag with half the mixture (now called a macaronage). Pipe small circles. Refill and repeat with remaining macaronage. Bang the baking sheet 2x on the counter to release bubbles. Set aside.
  8. Pre-heat oven to 300 degrees F. Let macarons sit and form a shell as the oven is pre-baking (15-30 minutes).
  9. Bake one sheet at a time for 15 minutes. The shells should easily release from the parchment. Cool on tray before filling.


Berry cream cheese filling
Ingredients
1 Tablespoon of butter, softened
¼ cup cream cheese, softened
2 Tablespoon of your favorite berry jam
2 Tablespoons icing sugar


Directions
Beat butter and cream cheese together until fluffy and combined. Add jam and icing sugar and mix to combine.


Assembly
Spread jam on one macaron shell and add (or pipe) a dollop of cream cheese filling on the other. Combine. But wait, you’re not done! Be sure to ripen them in the fridge in a sealed container for a minimum of 24 hours. This will improve flavour and texture. Don’t skip this step! It’s worth it.


Verdict: The bride and the guests were delighted by the macarons, which of course made me really happy! It just added a really nice touch to the event. I send everyone home with leftover cake and macarons.

Thursday 16 June 2016

Bridal Shower Part 2 - Chocolate Butter Cake


Part 2 of the Bridal Shower baking is the other cake - the chocolate cake. While chocolate cake is not my go-to, I knew that some people just have to have their chocolate. This cake is a chocolate lover’s dream with some sophistication with the raspberry jam between the layers and not too sweet swiss meringue buttercream. It was definitely what the kiddies (and some chocolohic adults) at the shower wanted.

Chocolate Butter Cake with Raspberry

Chocolate Butter Cake
I baked in three, 6-inch cake pans for about 40 minutes, until a toothpick came out clean.
Notes: be sure to whip the mayonnaise with a spoon before adding it into the batter. Instead of folding it in, I got better results by incorporating it with the beaters - just be sure not to overbeat.
When cooled, slice off domed top (and eat) and slice in half so you end up with 6 layers.

Chocolate Swiss Meringue Buttercream
Ingredients
3 egg whites
1 cup sugar
1 ½ cup unsalted butter
¼ teaspoon salt
½ teaspoon vanilla
125g chopped dark chocolate

Directions
  1. Wipe down bowl of stand mixer and whisk attachment with vinegar to get rid of any grease.
  2. Combine egg whites and sugar in bowl and place over a pot of simmering water. Place a candy thermometer on the side and whisk more or less continuously until the mixture reaches 155 degrees F.
  3. Take off the heat and whisk using the stand mixer until thick, glossy and cool. I like to put a gel ice pack around the bottom to speed up the cooling process.
  4. Meanwhile, cut butter into cubes.
  5. Melt chocolate over a pot of simmering water and set aside to cool. Or melt in 10 second intervals in the microwave, stirring in between.
  6. When the meringue is cool, change to a beater attachment and beat on medium, adding cubes of butter one at a time. Beat on high until smooth (may take a while, sometimes up to 20 minutes).
  7. Add salt and vanilla and beat to combine.
  8. Add melted chocolate and beat to combine. Note: Chocolate should be at room temperature, not warm.

Chocolate drip
Ingredients
⅓ cup chopped dark chocolate
2 Tablespoon butter

Directions
Microwave chocolate and butter in 10 second intervals until melted, stirring in between. Cool to room temperature before using.

Other ingredients
Raspberry jam, or whatever kind you have in the fridge.


Assembly
  1. Place first layer on your cake board. Spread jam and a thin layer of the buttercream. Place next layer and repeat with remaining layers, capping off with the last layer.
  2. Cover entire cake with buttercream to crumb coat (seal in the crumbs). Smooth out as much as you can with a metal spatula and place in fridge for 15 minutes to set.
  3. Add another layer of frosting and repeat until you get a smooth exterior.
  4. Spoon or pipe chocolate at the edge of the cake so that it drips down. Spread the remaining on the top with a metal spatula.
  5. Decorate and enjoy!


Verdict: The cake is super moist and rich (without being too dense) which is my favorite. The chocolate buttercream is not too sweet and the tartness of the jam cuts through the sweetness in the cake. I’ll definitely be making this again.

Stay tuned for the next post if you want to know how to make the macarons.

Thursday 9 June 2016

Bridal Shower Part 1 - Orange Earl Grey Cake


My very dear friend M is getting married! I’ve known this gal since we were in high school (we’re now in our 30’s to put this in context). We’ve been through a lot of fun and not so fun times (as is life) together and watched each other grow up. There have been times when we’ve been apart (she moved to Toronto for a while) and times when we didn’t get together often (I had grad school, she had a child!) but we have one of those friendships where we can jump right back in and nothing has changed. So I was delighted to help organize her bridal shower and send her on her way to her wedding in Santorini (talk about dream wedding!)!

We decided to throw her a Paris themed bridal shower since it’s her favorite place in the world and it’s where she got engaged. I decided to make an array of desserts to fit the theme, which I will post over the next little while.

First, cake! I made two cakes, an orange earl grey cake and a chocolate cake (to satisfy those for whom only chocolate will do). The orange earl grey cake was supposed to be two separate cakes (and orange creamsicle cake and an earl grey cake), but plans changed and I did a mash up - the flavours worked well together.

Check out the verdict at the end of the post!

Orange Earl Grey Cake
Orange cake layers by Tessa Huff
I baked them in two, 6-inch cake pans and the remaining batter in a small loaf pan (for snacking on).
The cakes baked for around 40 minutes or until a toothpick came out clean (started checking around 30 minutes).
When cooled, slice off the domed tops and slice cakes in half so you end up with 4 layers. (If making ahead, wrap in plastic and freeze. Defrost with the plastic on when ready to assemble.)

Earl grey cake layers by Tessa Huff
I cut the recipe in half and baked in two, 6-inch cake pans for around 40 minutes (or until a toothpick came out clean - started checking around 30 minutes).

Tea syrup by Tessa Huff
Ingredients
½ cup water
½ cup sugar
1 Tablespoon loose leaf earl grey tea

Directions
In a small saucepan, bring water and sugar to a boil. Bring down the heat to a simmer and add the tea. Let simmer for 10 minutes then take off heat and cool. Strain the leaves.
*I steeped the tea in the syrup for a week in the fridge for extra flavour

Cream cheese filling adapted from recipe by Tessa Huff
Ingredients
½ cup butter, softened
3 cups icing sugar
¼ cup + 2 Tablespoons cream cheese, softened and whipped with a fork
Zest of ¼ of an orange
3 Tablespoons of tea syrup (recipe above)

Directions
In a bowl, beat butter and icing sugar until smooth. Add cream cheese and beat until combined. Add orange zest and tea syrup. Feel free to add more syrup to get the consistency you want (should be spreadable).

Earl grey swiss meringue buttercream
Adapted from recipe by Tessa Huff
Ingredients
3 egg whites
1 cup sugar
1 ½ cup unsalted butter
3 Tablespoons tea syrup (from above)
½ teaspoon of ground earl grey tea

Directions
  1. Wipe down bowl of stand mixer and whisk attachment with vinegar to get rid of any grease.
  2. Combine egg whites and sugar in bowl and place over a pot of simmering water. Place a candy thermometer on the side and whisk more or less continuously until the mixture reaches 155 degrees F.
  3. Take off the heat and whisk using the stand mixer until thick, glossy and cool. I like to put a gel ice pack around the bottom to speed up the cooling process.
  4. Meanwhile, cut butter into cubes. When the meringue is cool, change to a beater attachment and beat on medium, adding cubes of butter one at a time. Beat on high until smooth (may take a while, sometimes up to 20 minutes).
  5. While on medium, gradually add tea syrup. Stop and add the ground tea and beat to combine.

Assembly
  1. Place orange cake layer on a cake board. Brush with tea syrup. Spread a cream cheese filling on top. Place another orange cake layer and repeat.
  2. Repeat with the two earl grey cake layers. Finish with the remaining two orange cake layers.
  3. Crumb coat with the Earl Grey Swiss Meringue buttercream. Place in the fridge for 15 minutes to set. Add another layer of buttercream and repeat until you get a smooth coat. Decorate and enjoy! (Keep the fridge and bring to room temperature ~2 hours before eating.)


Verdict:
The shower came together splendidly! The bride was really happy with all the little details and had a lot of fun. I’m so happy with how everything turned out and glad that I could send her on her way with a bang! I’m still coming down from the high of the event!
Oh and the cake? It was delic. I especially liked the fluffiness of the orange cake. The earl grey flavour was a complimentary flavour.