Sunday 24 November 2013

White Chocolate Cinnamon Chip Cookies


Lately, more and more I’ve been encountering baking recipes with cinnamon chips and was curious to what they taste like. I finally found them at a cooking supply store in Vancouver and stocked up with a big bag. Perfect for the upcoming baking season.

I decided to pair them in a cookie with white chocolate as they have a milder flavor compared to regular chocolate chips and would not overpower the flavor of the cinnamon chips. I also threw in some toffee bits for good measure (of which I also stocked up on a big bag!).


These are 72-hour cookies in that they are left in the fridge to “marinate” for 72 hours before baking, but if you want to make them right away, go for it (but believe me your patience will be rewarded).

Check out the verdict at the end of the post!

White Chocolate Cinnamon Chip Cookies
Base adapted from here.
Makes 20 cookies

Ingredients
¾ cup salted butter, softened
1 cup brown sugar
¼ cup sugar
1 egg
2 teaspoon vanilla
2 cups flour
2 teaspoon cornstarch
1 teaspoon baking soda
½ cup cinnamon chips
½ cup white chocolate chips
¼ cup toffee chips

Directions
1. In a stand mixer, beat butter and both sugars for 2 minutes.
2. Scrape down the sides and add egg. Beat for 5 minutes.
3. Scrape down the sides and add vanilla, and beat to combine.
4. In a bowl, mix flour, cornstarch, and baking soda. Add to butter mixture and beat until almost combined.
5. Add cinnamon chips, white chocolate chips, and toffee chips, and mix for a few seconds to combine.
6. Cover dough in plastic wrap and refrigerate for 3 days.
To bake:
7. Preheat oven to 350 degrees F. Line baking sheet with parchment or silicone mat.
8. Portion out dough with a 2-inch scoop and bake for 13 minutes.
9. Cool for 5 minutes on baking sheet before transferring to a rack.


Verdict: Cinnamon chips taste like cookie butter (aka speculoos, aka Biscoff)! This was pleasantly unexpected. The cookies were soft and chewy with nice crispiness on the edges. Hallmarks of an excellent cookie. What else can I do with my big bag of cinnamon chips?

Wednesday 20 November 2013

Coconut Crusted ChoCaramel Pie


Wow, that’s a lot of C’s!

I was having a girls’ lunch at my apartment and wanted to make a pie for dessert. So, I know I said that I don’t really like pie in a previous post, but for some reason the desire to make a toasted coconut crusted pie overcame me!

I’ll tell you up front that the first batch of caramel failed. Even though I almost constantly wiped the sides of the pot with a water-dipped pastry brush, the crystallization of sugar occurred and made the caramel gritty. So for my second batch, I cooked the sugar at a higher temperature to reduce the cooking time (and opportunity for crystals to form), and it turned out perfect!

Check out the verdict at the end of the post!

Coconut Crusted ChoCaramel Pie
Adapted from here.

Toasted Coconut Crust
Ingredients
¼ cup salted butter, softened
3 cups sweetened shredded coconut

Directions
1. Preheat oven to 350 degrees F.
2. In a bowl, mix the butter and coconut with your hands until the butter is evenly distributed and the mixture can form a ball.
3. Press into and up the sides of a 9-inch pie dish. Cover the edge with foil.
4. Bake for 10 minutes. Take off foil and bake for another 5 minutes or until golden.
5. Cool completely.


Salted Caramel
Ingredients
¾ cup sugar
1/3 cup water
1/3 cup heavy/whipping cream
¼ teaspoon vanilla
1 teaspoon salt
*you can double the recipe if you want a thicker caramel layer.

Directions
1. In a small saucepan, combine sugar and water and set over medium-high heat.
2. As the sugar cooks, brush the inside of the pan with a pastry brush dipped in water. This will prevent sugar crystals from forming (which = death of caramel).  Do not stir. Get the cream, vanilla, and salt ready.
3. When the sugar takes on an amber colour (takes around 20 min), take off heat and stir in cream (watch out for steam!). Add vanilla and salt, and stir to combine.
4. Let cool for 15 minutes before pouring into crust.

Dark Chocolate Ganache
Ingredients
1 ¼ cup chopped dark/bittersweet chocolate
2/3 cup heavy/whipping cream

Directions
1. Place chopped chocolate in a bowl.
2. Heat up cream in a saucepan to a simmer. Pour over chocolate and let sit for 10 minutes.
3. Starting from the middle, stir chocolate until cream is integrated and mixture is smooth.
4. Pour over set caramel layer.

Optional white chocolate swirls
Melt 1 oz (1/4 cup) of white chocolate in a water bath. Dollop onto ganache and swirl with a toothpick.

Set pie in fridge overnight to set. Take out 30 minutes before devouring.


Verdict: This pie was quite the showstopper – my friends eagerly anticipated dessert time and even those who are off carbs and who don’t like coconut had a piece. And it did not disappoint! Velvety dark chocolate with rich caramel with a kick of salt that oozed out from the middle of the pie, combined with the nutty toasted coconut crust was perfection.

Other things that I served at the lunch were salmon wellington and an arugula goat cheese salad with candied walnuts. We were stuffed.


The lunch ended with some news that was sweeter than the dessert! But you’ll have to wait for the reveal on another post!

Sunday 3 November 2013

Raspberry Cassis Layer Cake


This is a story about a cake wreck and a resulting cake scramble. 

For a long time now, I had been fantasizing about making a cake that’s covered in torched meringue.  They look so awesome with the white and caramelized brown edges. Plus how often do you come across a chance to eat a cake like that?

Well, an opportunity to make the cake opened up for a birthday. I knew that I wanted the inside of the cake to be light and fluffy, just like the meringue outside.  And I knew that I wanted it to resemble a pie – think lemon meringue pie, blueberry pie, coconut cream pie, banana cream pie. I landed on something like a mango pie.

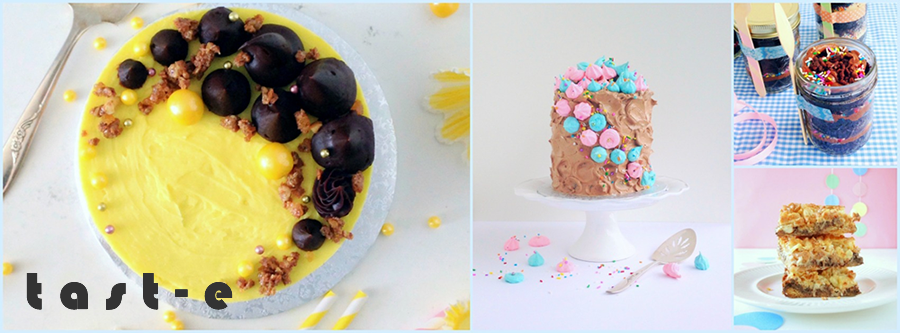
This is how the mango meringue cake turned out.

This is what happened after about 15 minutes.
The chiffon cake was too soft, the meringue disk in the middle became a slip-and-slide for the mango curd, the meringue frosting was not stiff enough, and the entire cake shifted (even though I had put a dowel in it!). I couldn’t serve this (although, I was quite happy with myself for not having a mental breakdown and getting upset as I normally would have!).

So, I had 3.5 hours to put together a new cake with whatever I had. Out popped out a Raspberry Cassis Layer Cake.  Luckily, I had made baked meringue peaks with leftover meringue from the previous cake.

By the way, cassis is black currant and also the best flavour of ALL time.

Check out the verdict at the end of the post!

Raspberry Cassis Layer Cake

Vanilla Cake
Adapted from here.

Ingredients
1/2 cup unsalted butter, room temperature
¼ cup vegetable oil (e.g., canola)
1 1/3 cup sugar
3 eggs, room temperature
2 teaspoon vanilla (+ ¼ teaspoon ground vanilla bean, optional but highly recommended)
2 cups cake flour
½  cup all purpose flour
1 ½ teaspoon baking powder
½ teaspoon baking soda
¼ teaspoon salt
1 cup buttermilk, room temperature

Directions
1.  Preheat oven to 350 degrees F. Line the bottom of 2, 6-inch cake pans with parchment and grease and flour the sides.
2.  Beat butter to soften. Add oil and sugar, and beat until fluffy.
3.  Add eggs one at a time, beating after each addition. Add vanilla and beat to combine.
4.  In a separate bowl, sift both flours, baking powder, baking soda, and salt to combine.
5.  Add flour to butter mixture in 3 additions, alternating with buttermilk and beating on low just until combined.
6.  Divide into the cake pans and bake for about 25 minutes, or until a toothpick comes out clean.
7.  Spoon about half of the vanilla simple syrup (recipe to follow) over the three cakes while in pans, and cool for 20 minutes.
8.  Turn out on rack and spoon the remaining syrup over the bottom of cake layers and cool completely.

Vanilla Simple Syrup
Combine ¼ cup sugar, ¼ cup water, and 1/8 teaspoon ground vanilla beans in a small saucepan and heat on medium until sugar is dissolved.

Raspberry Cassis Swiss Meringue Buttercream
Adapted from here.

Ingredients
3 egg whites (75g)
½ cup + 2 Tablespoons sugar (125g)
1 cup unsalted butter, room temperature, cut into ½-inch cubes
1 teaspoon vanilla
¼ teaspoon salt
½ cup fresh raspberries or thawed frozen raspberries
2 heaping Tablespoons black currant jam

Directions
1.  In a clean metallic bowl, with a clean whisk (no trace of grease/oil/fat), combine egg whites and sugar, and lightly beat over a pot of simmering water until the mixture reaches 140 degrees F.
2.  Take off heat and whisk on high until thick, glossy, and cooled.
3.  Switch to a beater and while on medium high, add cubes of butter one at a time.
4.  Beat on high until smooth and silky. Add vanilla, salt, raspberries, and black current jam, and beat to combine.

Assembly
1.  Level cake layers with a bread knife.
2.  Place first layer on cake plate. Pipe a bridge of buttercream around the edge of the cake.
3.  Fill with black currant jam.
4.  Place next cake layer on top, and repeat. Top with final cake layer.
5.  Spread entire cake with a thin crumb coat, and final layer.


Verdict: The Raspberry Cassis Cake was a hit! No one had made a cake for the birthday girl before so she was really happy, PLUS, raspberry happened to be one of her favorite flavours! Yay, luck was on my side! The cake layers were fluffy and moist with a pretty delicate crumb and the baked meringue peaks gave it a texture contrast.

By the way, the mango meringue cake was phenomenal – super fluffy and cloud-like. Just what I wanted – at least now I know that it needs more of a sturdy structure. I’ll try again another time.